Hi friends!! Today I'm sharing this little wreath project that I gave you a sneak peek of yesterday on Facebook. I found this great square pine cone wreath at Target several years ago. It seems like every year when I pull it out of storage it has lost a few more pine cones and it was looking like its best days were behind it. I've seen very similar sad-looking wreaths at the thrift store, too. I love to reinvent things and save them from the trash heap so I knew I had to give this one a shot.
To begin, I filled in all the holes from pine cones missing around the wreath by pulling off all the pine cones in one corner and hot gluing them into the the gaps. If you don't already have a pine cone wreath to work on, you could begin by hot gluing pine cones onto a wreath form, leaving a small section uncovered to add rosettes.
Once I had all the pine cones where I wanted them I gave it a light coat of gold spray paint. I absolutely love the gold trend in home decor lately! You can go as light or as heavy as you want with the gold spray paint. I wanted to just hit the tops of the pine cones to give it some shimmer while retaining a more rustic look, so I didn't worry about getting paint in all the nooks and crannies.
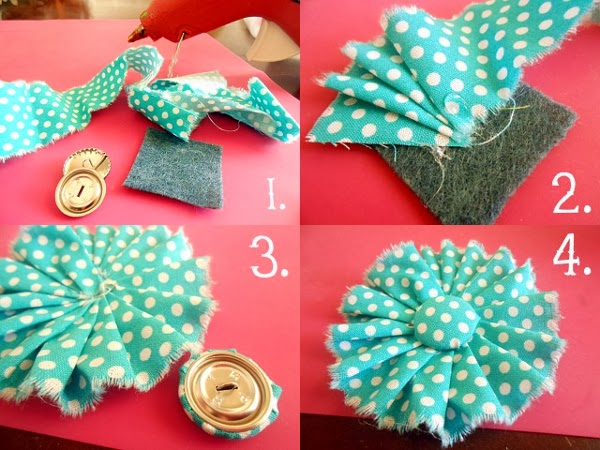
While the paint was drying, I made some easy burlap rosettes. These pictures show a different fabric, but you get the idea, right?
For the rosettes you will need:
a strip of fabric 1-2 inches wide by about 18 inches long
a small square of felt
a button for the center {I used fabric covered buttons in these pictures, but used vintage-looking gold buttons on my finished wreath}
and a hot glue gun.
Keep
in mind that your finished rosette will be roughly twice as wide as you
fabric strip is so the wider your fabric is, the larger your rosette
will be. Form the rosette by
attaching the end of the fabric strip to the felt square with a dab of
hot glue, then continuing to dab glue and pleat the fabric all the way
around until you get back around to where you started. Hot
glue a button in the center of the rosette to finish it off.
Arrange the rosettes to fill the empty space on your wreath and attach them with more hot glue. I wanted to add something to the top corner to balance the rosettes visually, so I created a pennant banner. Just print out your letters onto old book pages and cut them out in any shape you choose. Fold the top edge back over a piece of twine and secure with glue.
Leave about 12 inches of twine on each end of the banner and use that to attach it to the wreath by wrapping it around and tying a bow.
I love that I was able give a tired old wreath some fresh life again! And the glittery gold touches look so pretty against my black front door. Sadly, not one person in my family noticed it when they came home yesterday. They tell me it's because I change things around here so much they're "numb to newness". Whatever. I love it and that's what really matters.
Have a great weekend, guys!


Hi Amy. I've been trying to reach you via email. Maybe it went in your spam folder? Have a nice day!
ReplyDeleteThe burlap rosettes really finish this wreath off, they look awesome.
ReplyDeletethis is supper cute, I think I'll start mine with an old picture frame:)
ReplyDelete